Important note
My goal with these tutorials is to help you and guide you through the development of a project and to give you advice and tips for the LCOM course. These guides ARE NOT a way for you to just easily skip the course. Therefore, I will demonstrate how to develop this project from scratch but I will not show you how to code the stuff you are supposed to do in class. Things like developing basic functions to write to the video memory, handle the timer, handle mouse clicks and keyboard presses are expected from you, and I will make use of these abstractions without showing you their source code.Adding graphics
The first thing we are going to do is to add some graphics to our program! I will take into account that you already have developed your own graphics library during class.You should have two files. I named mine Graphics.c and Graphics.h. As you might know, the .h file is where the functions are declared, where as in the .c the functions are actually defined.
You should have implemented the VESA BIOS Extensions during class as well. I implemented them in VBE.c and VBE.h.
You should also have a file named LmLib.h, which is provided in the class handout.
In addition to these, in every project I work, I usually define a Utilities.c and Utilities.h where I define some useful functions. Below is a screenshot of my Utilities current state, where is also visible the current content of the src folder. You should have all these files in there by now.

In this case, as you can see, I only defined three macros and a function to verify a file's existence. Pay special attention to these macros: you will find them really handy throughout LCOM. If you don't know what a macro is or do not understand what these specific macros are for, I strongly advice you to do a research on google for yourself.
Update Makefile
Do not forget to constantly update your Makefile: since we've added a lot of files to the src folder, you should declare the .c files after the SRCS label, otherwise the compiler will not know of their existence at compile time.Below is my current Makefile. Notice that the new files have been declared at line 7.

Update main.c
Now that we have everything set, let's update main.c to make the program fill the display with the color blue for two seconds and then terminate. Here is how my main.c looks like:
You might be asking: What are all those functions? Where is fillDisplay() defined? Where is BLUE defined?
These are all functions I have developed. You might have developed functions which do almost the same thing but have different names. I will now give you some advice about them.
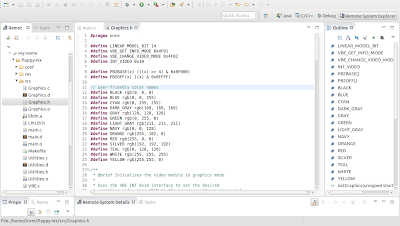
As you can see, I have color names! And they are VERY useful. I defined them in Graphics.h as preprocessor directives - look at the screenshot below. This is a nice way to easily access and pass colors to functions! It is a good idea for you to have them. You should notice though that they make use of the rgb() function, which you should implement.

The mouse buffer
I have also implemented two functions called flipMBuffer() and flipDisplay(). What are they used for? Well, it is something similar to a triple-buffer: I have three buffers: videoMem, mBuffer and buffer - flipMBuffer stands for flip mouse buffer and mBuffer stands for mouse buffer.Here is how all it works: every graphics function I have defined writes to the buffer. So, say I call drawRectangle(), the function will modify the buffer. Everything except for the mouse is written there: when I call drawMouse(), that function copies the buffer to mBuffer and only then draws the mouse cursor directly in mBuffer. This enables me to update the mouse more frequently, because in order to draw the mouse cursor, I do not need to redraw every polygon of the entire scene, as long as the objects in the scene have not changed! I just copy the buffer to mBuffer again and draw the mouse cursor directly there. Do you get it? This way we can update the mouse more frequently and as a consequence, the mouse cursor movement will look much more fluid. After that, whenever I want to update the display with what has been written to the mBuffer, I just need to call flipDisplay(), which will copy the mBuffer to the video memory - the screen buffer, where we actually see the graphics.
Below is a draft with the logic behind all this.

Testing the program so far
To test the program, go to minix, browse to the project folder, compile the program and run it. There is no need to run sh install.sh again because we've already run it once; it is only necessary to run it again when we make changes to the res folder.
And this should be the result: a blue screen lasting two seconds.

No comments:
Post a Comment